How to resize the root LVM partition of Ubuntu
When we resize the virtual hard disk of a virtual machine or restore a disk image to a larger disk, the free space of the partition detected by Ubuntu will not increase because the partition table is unchanged. In the past, we could easily resize the ext4 root partition with the help of resize2fs. However, things get complex when Ubuntu utilizes LVM partition as their default root partition.
Quick Intro to LVM
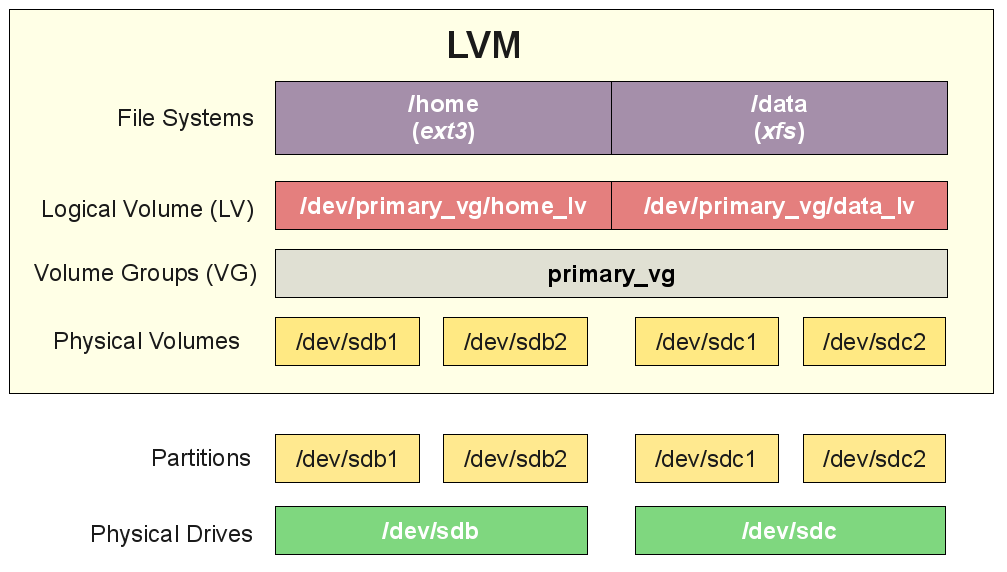
Logical Volume Manager (LVM) is similar to Dynamic Disks under Windows, which can take several GPT / MBR partitions on different hard disks as a storage pool (LVM call it Volume Groups, VG), and allocate spaces from this pool, then Linux will recognize each space (LVM call it Logical Volume, LV) as an useable partition.

Thus, we should modify not only the GPT / MBR partition table, but also the LVM configuration.
Update GPT / MBR partition table
I suggest all the operations should be done under live CD environment to avoid the occurrence of unpredictable problems. I didn't test online resizing on the root partition so far.
- The following instructions in this section assume the last partition on your disk is the LVM Physical Volume. You could verify this with the command
lsblk --fs.nvme0n1p3is the last GPT partition on the disknvme0n1, and it is easy to identify this partition is a LVM PV, andubuntu--vg-ubuntu--lvis the corresponding LV.
1 | tonny@vm:~$ lsblk --fs |
Note that
ubuntu--vg-ubuntu--lvis the root partition of the system here.
2
3
4
5
6
Filesystem Type Size Used Avail Use% Mounted on
/dev/mapper/ubuntu--vg-ubuntu--lv ext4 78G 7.7G 67G 11% /
/dev/nvme0n1p2 ext4 974M 87M 820M 10% /boot
/dev/nvme0n1p1 vfat 511M 3.6M 508M 1% /boot/efi
/dev/mapper/test--vg-test--lv ext4 464M 24K 429M 1% /home/tonny/mntAlso you could check the LVM Volume Group status by
vgs.
2
3
4
VG #PV #LV #SN Attr VSize VFree
test-vg 1 1 0 wz--n- 496.00m 0
ubuntu-vg 1 1 0 wz--n- <78.50g 0
- Update the GPT / MBR partition table using
fdisk. I will use an emulated disk/dev/loop3to demonstrate the whole process. Don't worry, you won't loss your data under normal circumstances. These commands will only modify the partition table, but make sure DO NOT remove the LVM's signature, otherwise the system may no longer recognize your LVM PV.
1 | tonny@vm:~$ sudo fdisk /dev/loop3 # replace with your hard disk, such as /dev/nvme0n1p3 |
Update LVM Configuration
- Notify LVM there is an update on the partition table.
1 | tonny@vm:~$ sudo partprobe # ask kernel to read the new partition table |
At this moment, the LVM Volume Group status has changed to,
2
3
4
VG #PV #LV #SN Attr VSize VFree
test-vg 1 1 0 wz--n- 1020.00m 524.00m
ubuntu-vg 1 1 0 wz--n- <78.50g 0Observe that
VFreeoftest-vghas increased by 524.00 MB.
- Resize LVM Logical Volume. The following command will allocate all the free space of VG to the LV.
1 | tonny@vm:~$ sudo lvextend -l +100%FREE /dev/mapper/test--vg-test--lv |
The free space of VG is used up now.
2
3
4
VG #PV #LV #SN Attr VSize VFree
test-vg 1 1 0 wz--n- 1020.00m 0
ubuntu-vg 1 1 0 wz--n- <78.50g 0
Resize ext4 File System
Up to now, although LVM LV is resized, the ext4 file system is not aware of the extra available space. Simply run resize2fs to let it know.
1 | tonny@vm:~$ sudo resize2fs /dev/mapper/test--vg-test--lv |
We can see the available space of
test--vg-test--lvhas been enlarged.
2
3
Filesystem Size Used Avail Use% Mounted on
/dev/mapper/test--vg-test--lv 973M 1.3M 917M 1% /home/tonny/mnt